Monday, October 24, 2011
buttons
Several months ago I was on thenest.com and came across a link to a tutorial on how to make buttons! I was immediately interested in this crazy idea. Within a few days I was at the story purchasing the necessary supplies. I bought Shrinky Dink plastic paper, the recommended pens, and I borrowed hole punches from a friend. I got it all home....and then on the shelf it all sat. I think I didn't jump on this project immediately because it's quite intimidating. First, you want to NEED buttons - and I don't. Second, you have to have ideas of things to draw on the buttons - and I didn't. Third, any letters you write have to be written backwards - difficult.
Here's the tutorial I used
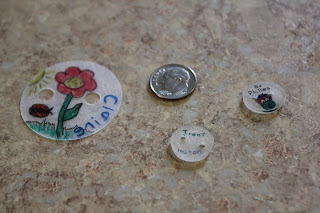
My first attempt was more or less a practice run. I didn't want to do anything too extravagant just to cook it for took long and ruin it, so I did something simple: my sons first and middle name. It's off centered and boring to look at, but like I said, it was practice.
Second attempt was the Phillie Phanatic. This time I wrote the words "go phillies" on a piece of paper then turned it over and traced it onto the button. This method adds some time but it's makes for nicer looking letters.
My third button was of a flower with my daughters name.
Fourth button is a baseball...kind of.
I found the process to be so 'neat'. The buttons ended up being so much smaller than I thought they'd be - they are smaller than a dime - they are harder than I thought they'd be, and they cooked much quicker than I thought they would. I definitely plan to make more in the future, I just need to come up with more ideas of stuff to draw on them.
Labels:
buttons,
shrinking plastic
Subscribe to:
Post Comments (Atom)


No comments:
Post a Comment