
Wednesday, December 21, 2011
Monday, December 19, 2011
wish me luck
last week I bought a pattern and today I bought fabric for my first attempt at a formal dress for my Claire.
This dress is going to be blue.
Wish me luck
This dress is going to be blue.
Wish me luck
Wednesday, December 14, 2011
big sewing news...
I'm going to attempt to make a flower girl dress for my daughter to wear in my sister-in-law's wedding!!
My plan is to make a couple "practice dresses" first to make sure the day-of dress will look professional enough (according to the standards of myself, my husband, and of course, the bride!).
Sadly, for you, I will want to keep the dress a surprise from the rest of the family, so I probably won't post pictures of the dress(es) until after the wedding.
Well, I'm sure I'll post teaser photos ;-)
Saturday, December 10, 2011
snowman shirt
Another pinterest rip-off. This one originated from etsy seller: prissypeacockdesigns

To start you need:
~ a white t-shirt (see my paragraph about t-shirts here)
~ 2 buttons
~ black fabric
~ orange fabric
~ heat'n bond iron-on interfacing

I couldn't find any by-the-yard orange fabric I liked so I went with a very cute fabric quarter. As it turned out, the thin cardboard from the fabric quarter was perfect to make a pattern (see above).
I'm not totally in love with the buttons - I wish they were a tad bigger - but they will do. It looks like the original shirt was made using a button kit and fabric.
I used different things I had laying around the house to trace for the mouth circles.


The size circles you want to use will depend on the size shirt you're using.
I definitely recommend using heat 'n bond! Simply iron it to the nose and mouth pieces, peel the paper off, figure out where you want the pieces on the shirt, then ironing those pieces to the shirt. Once it's all bonded use a zigzag stitch to further secure everything. I even used the zigzag stitch to attach the button eyes.
That's it. It's an extremely quick and easy project.

Wednesday, December 7, 2011
Christmas Tree Ribbon Shirt

I went to Walmart for the shirt. It's been my experience that Walmart is a great place to get simple, plain shirts for things like this. Sometimes the plain shirts have pockets and sometimes they don't. If they do, don't be discouraged. The pockets come off easily with a seam-ripper and you can hardly see any traces of where the pocket once resided. When I went to Walmart yesterday I was surprised to find a selection of solid colored short-sleeved shirt, long-sleeved shirts, and even turtle necks. The color selection isn't bad either - they offer the basics. Oh, and the price = $3.88. I'm sure they go on sale for even cheaper from time to time but I rarely (almost never) shop there, so I can't say for sure.
So, I bought a shirt. I was originally going to buy a white shirt but they didn't have Claire's size, so I went with a beautiful red instead.
As for ribbon, I totally cheated on my precious Joann Fabrics and I went to Michael's. They had a cuter selection.
The button is from Joann Fabrics.
To begin, gather all your supplies and try to decide the order in which you want your ribbons. Not as easy as it sounds. I can't tell you how many times I rearranged everything (typical Barbie....so indecisive). I added some non-festive ribbons from my own personal collection, to see what works, but I ended up sticking with the classics: red, green, white, and silver.

You can kind of see there's a pocket on my shirt. I just took my seam-ripper to it and had it off within a few minutes.
Next, I cut all the ribbon pieces to the sizes I wanted and I folded the cut edges under to help prevent future fraying. (I did not fold under the rickrack).
Now for the hard part: lining all the ribbons up straight, evenly spaced and centered, then pinning them to only the top layer of the T. I'm sure if you wanted to take the time to add double-sided interfacing to each ribbon you will have less shifting issues when placing and sewing the ribbons, but that's up to you.

.
All that's left to do is sew each ribbon to the shirt and then sew the button on. For the rickrack I sewed one straight line down the center, and for the other ribbons I sewing all 4 sides very close to the edge.
Ta-Da. It's not perfect, but it'll do!


Friday, December 2, 2011
minnie
With only 9 hours until we leave for vacation (and only 7 until I have to wake up) I finished Claire's backpack!! As of this morning I was going to leave her backpack the way it was and just finish it once we returned from vacation, but tonight, last minute, I decided to completely finish it. All I had to do was the lining of the backpack, but that still took about an hour.
I snapped a few quick pictures for now, but I hope to post better ones soon!
Now I'm off to bed.
If you're confused it's because I scheduled this post to show up later than I actually typed it.
I snapped a few quick pictures for now, but I hope to post better ones soon!
 |
| front |
 |
| back |
 |
| a peek inside |
If you're confused it's because I scheduled this post to show up later than I actually typed it.
Wednesday, November 23, 2011
Tuesday, November 22, 2011
my most time consuming project thus far
The I-Spy Quilt
I first started this quilt back in May. 6 months later and it's finally completed!!! I blogged about it here once I had the front finish, but I still had a long way to go at that point.
As I mentioned before, I followed Obsessively Stitching's tutorial to do the front of the quilt (a disappearing 9 patch). I followed my Aunt's advice for taping the front down to the floor, layering, pinning, and trimming. I decided on my own that I wanted to use an "s" stitch "in the ditch" (I have no idea if the stitch I used it actually called an "S" stitch, and I'm not quite sure if what I actually did is considered "in the ditch"....but just go with it). Of course my machine didn't have the "s" stitch. Nor did the amazing machine I'm borrowing from a friend. I had to borrow another sewing machine just to get what I wanted!! I followed the guidance of my Aunt to do the binding, and viola - a finished quilt!!! I'm really very pleased with it, and my children enjoy playing with it.
It's funny because the whole time I was making it I kept saying I will never make another quilt - that they are too tedious and time consuming. But wouldn't you know, now that I'm done with the one, I want to do another. Eeeek.
So, here she is in all her glory:

Here's a small glimpse of the back:

A close up of a square, and the stitch I used:

"Hey Trent, show me the dog that looks like Maggie":
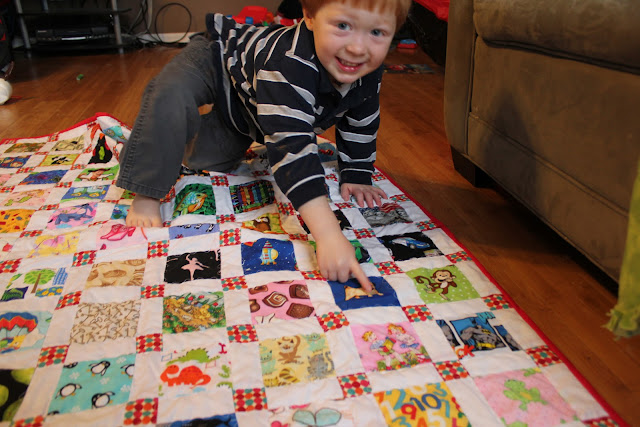
and in case anyone was wondering: it's approximately crib size.
Thursday, November 17, 2011
more cloth diapers
I posted here about a cloth diaper I made a while back. An update on that cloth diaper: it's not holding up very well. I partly blame the fabric but I also blame myself. My professional cloth diapers are washed and dried the same way as my homemade cloth diaper, and they hold up fine, which goes to show you the quality of the PUL is different. I blame myself because I could have stopped putting the homemade diaper in the hot dryer once I noticed the effects the heat was having on it. The waterproof coating of the PUL is starting to "chip" and peel. Fortunately it hasn't effected the absorbency of the diaper at all (yet?) and we still use it.
Some of you may have noticed that Joann Fabrics is carrying a new line of PUL fabric and coordinating accessories, called Babyville. The designs and colors they chose for this line are adorable!! A friend of mine asked me to make her a few for the baby she's expecting, so I decided to try out this new babyville line. I'm hoping the quality of the babyville PUL is better than the other PUL they carry, but either way I definitely recommend air/line drying. I also purchased the cloth diaper pattern book they sell, which is great! The book tells you how to make almost any kind of diaper you can imagine, complete with color photos and step by step directions. My friend flipped through the book and chose the style of diapers she wanted and I got right to work.

The first diaper I made for her (monkey diaper) is a size medium pocket diaper with offset side snaps. "Pocket diaper" means there's a pocket in the back where mom can stuff the diaper with an insert(s). "Side snaps" means the snaps are along the side of the diaper rather than the front, like most diapers. And "offset snaps" means that rather than the two rows of snaps being directly on the top of one another, the top row is offset so that the snaps are diagonal to one another. This type of snap placement is especially nice when you have a baby that has a wider stomach than thighs, or visa versa.


The second diaper I made for her is a one-size pocket diaper with offset snaps and gussets. "One size" means it has an adjustable rise which adjusts to fit very small babies as well as older, larger babies. I included a set of crossover snaps so that the waist could be adjusted to fit the tiniest baby. "Gussets" are fabric that's been placed at the leg openings to help 'keep the mess in'.


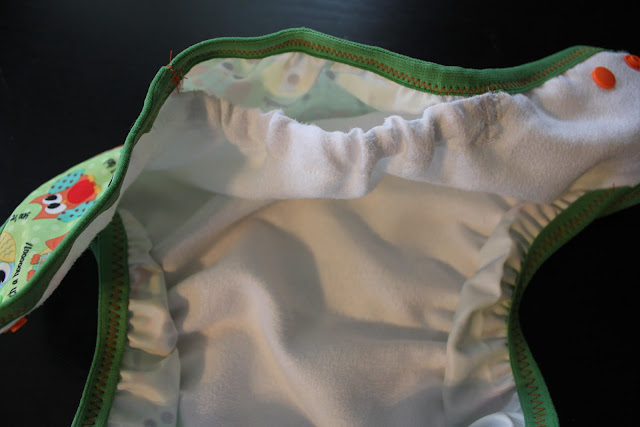
Each diaper is lined with a white micro suede.

I had enough supplies left over to make a third diaper, so I chose to make another one size pocket diaper with offset snaps and gussets. This diaper is a solid orange color with an owl applique applied to the back. The main different between this diaper and the owl diaper above is that this diaper is lined with 100% cotton flannel, and this one does not have crossover snaps (although they could easily be added). I have this diaper listed on my etsy site for anyone who's interested.

Some of you may have noticed that Joann Fabrics is carrying a new line of PUL fabric and coordinating accessories, called Babyville. The designs and colors they chose for this line are adorable!! A friend of mine asked me to make her a few for the baby she's expecting, so I decided to try out this new babyville line. I'm hoping the quality of the babyville PUL is better than the other PUL they carry, but either way I definitely recommend air/line drying. I also purchased the cloth diaper pattern book they sell, which is great! The book tells you how to make almost any kind of diaper you can imagine, complete with color photos and step by step directions. My friend flipped through the book and chose the style of diapers she wanted and I got right to work.

The first diaper I made for her (monkey diaper) is a size medium pocket diaper with offset side snaps. "Pocket diaper" means there's a pocket in the back where mom can stuff the diaper with an insert(s). "Side snaps" means the snaps are along the side of the diaper rather than the front, like most diapers. And "offset snaps" means that rather than the two rows of snaps being directly on the top of one another, the top row is offset so that the snaps are diagonal to one another. This type of snap placement is especially nice when you have a baby that has a wider stomach than thighs, or visa versa.


The second diaper I made for her is a one-size pocket diaper with offset snaps and gussets. "One size" means it has an adjustable rise which adjusts to fit very small babies as well as older, larger babies. I included a set of crossover snaps so that the waist could be adjusted to fit the tiniest baby. "Gussets" are fabric that's been placed at the leg openings to help 'keep the mess in'.


Each diaper is lined with a white micro suede.

I had enough supplies left over to make a third diaper, so I chose to make another one size pocket diaper with offset snaps and gussets. This diaper is a solid orange color with an owl applique applied to the back. The main different between this diaper and the owl diaper above is that this diaper is lined with 100% cotton flannel, and this one does not have crossover snaps (although they could easily be added). I have this diaper listed on my etsy site for anyone who's interested.

Tuesday, November 8, 2011
Halloween 2011
We had a hard time coming up with Halloween costumes this year - for all 4 of us. Kevin and I had specific costumes in mind, but then we both changed our minds. When we finally decided that Trent would be the Phillie Phanatic, the Phillies were still in the playoffs. Shortly after we made the decision they were no longer in the running. Oh well. Still fun. Kevin came up with the idea to be a mime and I came up with the idea for Kevin to be the Phanatic too, so he went with my idea and I went with his. Confusing? I came up with the idea for Claire to be a purple monkey a while ago, but I wasn't set on the idea until mid-October. A monkey seemed very fitting for her because she climbs around like a monkey.
Our local fabric store doesn't carry green fur, so I ordered five and half yards of green faux fur from fabric.com. It was just enough.

I made Claire's costume out of anti-pill fleece from Joann Fabrics.

All 3 costumes closed up the back using velcro. All 3 hoods closed under the chin with velcro.

I used Simplicity 2853 pattern for Kevin's Phanatic costume, and I used McCalls M6105 for both Trent and Claire's costumes.


The Phanatic faces were made using basic craft supplies from Joann Fabric, including styrophome, boas, felt, foam, and a hot glue gun.


The tongues were simply party blowers. I got glued Trent's in place, but for Kevin's I poked a hole thru the entire hood so that he could actually blow into it and shoot the "tongue" out - similarly to the real Phanatic. I also made a pair of mittens for his hands. As for his feet, we bought a pair of clown shoes and added the Phillies logos to them.

Overall, a great year for costumes

Saturday, October 29, 2011
halloween
Halloween has been my favorite holiday for a while now, and over the last 5 or 6 years it's become a big deal. It all began in 2005 with a Halloween party where the costumes were all store bought and ridiculous. But this party became an annual tradition and the costumes got progressively better. Sometimes our costumes are sewed from scratch and other times they are pieces that we have to alter and/or put together.
In 2006 my husbands costume was one that was altered and pieced together. He was the Incredible Hulk.

In 2007 I sewed myself a dress made a wig so I could be Marge Simpson and hubby 'pieced'. 2008 was more pieced together costumes.

2009 was my first really big sewing year. I made every single piece of my own costume, except the gloves, and I sewed my husbands costume. Big year!

 2010 was another big sewing year when it came to my own costume
 2010 was also the first year I made a costume for my children! I made my sons Dash Incredible costume!! I also made a little shirt for the dog.
 To make the dogs t-shirt I simply cut up an old t-shirt of hers and I used the pieces as a pattern. For Trent's costume I traced a sleeper of his for the bodysuit, I used trial-and-error to make the underwear, and I used a pattern for the boots.
Stayed tuned for Halloween 2011
In 2006 my husbands costume was one that was altered and pieced together. He was the Incredible Hulk.

In 2007 I sewed myself a dress made a wig so I could be Marge Simpson and hubby 'pieced'. 2008 was more pieced together costumes.

 |
| Michael Phelps is my husband....not Bobs Big Boy |
2009 was my first really big sewing year. I made every single piece of my own costume, except the gloves, and I sewed my husbands costume. Big year!


Stayed tuned for Halloween 2011
Monday, October 24, 2011
buttons

Several months ago I was on thenest.com and came across a link to a tutorial on how to make buttons! I was immediately interested in this crazy idea. Within a few days I was at the story purchasing the necessary supplies. I bought Shrinky Dink plastic paper, the recommended pens, and I borrowed hole punches from a friend. I got it all home....and then on the shelf it all sat. I think I didn't jump on this project immediately because it's quite intimidating. First, you want to NEED buttons - and I don't. Second, you have to have ideas of things to draw on the buttons - and I didn't. Third, any letters you write have to be written backwards - difficult.
Here's the tutorial I used
My first attempt was more or less a practice run. I didn't want to do anything too extravagant just to cook it for took long and ruin it, so I did something simple: my sons first and middle name. It's off centered and boring to look at, but like I said, it was practice.

Second attempt was the Phillie Phanatic. This time I wrote the words "go phillies" on a piece of paper then turned it over and traced it onto the button. This method adds some time but it's makes for nicer looking letters.


My third button was of a flower with my daughters name.

Fourth button is a baseball...kind of.
I found the process to be so 'neat'. The buttons ended up being so much smaller than I thought they'd be - they are smaller than a dime - they are harder than I thought they'd be, and they cooked much quicker than I thought they would. I definitely plan to make more in the future, I just need to come up with more ideas of stuff to draw on them.

Subscribe to:
Posts (Atom)