Saturday, October 29, 2011

halloween

Halloween has been my favorite holiday for a while now, and over the last 5 or 6 years it's become a big deal.  It all began in 2005 with a Halloween party where the costumes were all store bought and ridiculous.  But this party became an annual tradition and the costumes got progressively better.  Sometimes our costumes are sewed from scratch and other times they are pieces that we have to alter and/or put together.

 In 2006 my husbands costume was one that was altered and pieced together.  He was the Incredible Hulk.

In 2007 I sewed myself a dress made a wig so I could be Marge Simpson and hubby 'pieced'. 2008 was more pieced together costumes. 

Michael Phelps is my husband....not Bobs Big Boy

2009 was my first really big sewing year.  I made every single piece of my own costume, except the gloves, and I sewed my husbands costume.  Big year!

2010 was another big sewing year when it came to my own costume
 2010 was also the first year I made a costume for my children!  I made my sons Dash Incredible costume!!  I also made a little shirt for the dog.
To make the dogs t-shirt I simply cut up an old t-shirt of hers and I used the pieces as a pattern.  For Trent's costume I traced a sleeper of his for the bodysuit, I used trial-and-error to make the underwear, and I used a pattern for the boots.

Stayed tuned for Halloween 2011

Monday, October 24, 2011

buttons


Several months ago I was on thenest.com and came across a link to a tutorial on how to make buttons!  I was immediately interested in this crazy idea.  Within a few days I was at the story purchasing the necessary supplies.  I bought Shrinky Dink plastic paper, the recommended pens, and I borrowed hole punches from a friend.  I got it all home....and then on the shelf it all sat.  I think I didn't jump on this project immediately because it's quite intimidating.  First, you want to NEED buttons - and I don't.  Second, you have to have ideas of things to draw on the buttons - and I didn't.  Third, any letters you write have to be written backwards - difficult.

Here's the tutorial I used

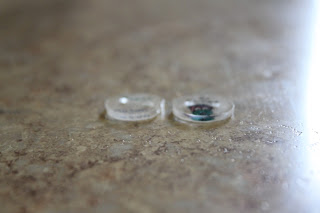
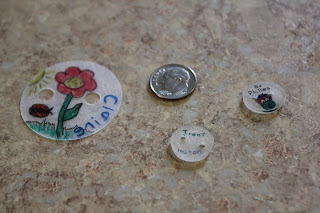
My first attempt was more or less a practice run.  I didn't want to do anything too extravagant just to cook it for took long and ruin it, so I did something simple: my sons first and middle name.  It's off centered and boring to look at, but like I said, it was practice. 


Second attempt was the Phillie Phanatic.  This time I wrote the words "go phillies" on a piece of paper then turned it over and traced it onto the button.  This method adds some time but it's makes for nicer looking letters. 


My third button was of a flower with my daughters name. 


Fourth button is a baseball...kind of.


I found the process to be so 'neat'.  The buttons ended up being so much smaller than I thought they'd be - they are smaller than a dime - they are harder than I thought they'd be, and they cooked much quicker than I thought they would.  I definitely plan to make more in the future, I just need to come up with more ideas of stuff to draw on them.


Friday, October 21, 2011

previous refashion

Remember this dress?

I made it back in August, when it was stifling hot outside.  Well, she finally got to wear in earlier this month!  I was thankful it still fit her, but I know she won't get much use out of it - it's quite tight in the chest. 


Thursday, October 13, 2011

floral pants

I bought this fabric a year ago, along with several other corduroy prints.  There was a corduroy sale and I went a bit crazy.  I have a thing for corduroy - what can I say.  Not long ago I finally decided this print would make a very cute pair of pants for Claire, so last week I made them.  It only took me a couple hours to whip them up - and it only took that long because I did pockets, and at the last second I went back and added ruffles to the bottoms.  They turned out more 'hippy' than I had expected, but still super cute!  


here you can see the original hem of the pants, then where I added the ruffle


close up of the pocket


I didn't exactly have a shirt to match the pants, so I had to make do.  One thing I learned from "What Not To Wear" is that pieces don't have to match, they simply have to go.  Go ahead and call me crazy, but I think this orange-y shirt goes splendidly with these pants.

trying to get into a pocket


Now this is a much better match!  We had Trent's soccer practice later in the day and it got chilly, so we put her owl hoodie on her.


Overall I'm very happy with them.  The waist isn't quite high enough in the back, and I left zero growing room in the legs, but for now they are great!

Sunday, October 9, 2011

the cutest jacket ever

Claire's godmother bought us this pattern from Etsy seller kitschycookids.  It's for an asymmetrical, reversible jacket!  I was extremely excited to get started but had to have the perfect fabric.  I checked out the fabric store three different times before spotting an argyle corduroy that I couldn't resist.  I paired it with a solid gray corduroy.  The only other thing I had to buy was a button kit that allows you to cover buttons with whatever fabric you want.

It really didn't take very long to make this jacket at all.  I was actually kind of surprised how quick it was to make.  I was extremely happy with the directions that came with the tutorial - very easy to understand and follow.  And of course I'm thrilled with the end product.  It's absolutely fabulous!  The moment I saw the pattern online I wished she made it in my size!  I also knew from the beginning that I will be making a few of this jacket over the years, using different fabrics depending on the season.  The pattern came with 2 different sizes; 18/24 month and 3/4T, so that will get me through the next few years.  If I'm not tired of this style after she's 4, I can purchase a larger sized pattern from the same seller that will get Claire thru 8T ;-)


I made this jacket using the 18/24 month pattern and, unfortunately, it's too big.  Claire is a petite 18 month old.  I couldn't wait to make this jacket so that she could wear it right away - and all throughout fall - and now I have to wait until next year. 


I'm thinking about putting this one in the closet and attempting to alter the pattern to make a jacket that will fit her NOW.  I'm not very experienced with altering and sizing patterns, so I'm a little nervous, but how hard could it be? 

No seriously, does anyone know how hard it is?

Friday, October 7, 2011

Da Da Da Da Da Da Da Da BATMAN!

Another superhero cape.  This one goes to my second etsy buyer!  One side is Spiderman and the other is Batman - a first for me.


Thursday, October 6, 2011

buuurrrrrrrp

I recently sat down and made some burp cloths for a friend.  Well, I didn't actually make them, I just altered them to make them nicer to look at and perhaps a little more practical.  All I did was cover some cloth diapers with flannel. 

Sew She Sews was my inspiration.

I sewed most of the burp cloths using my sewing machine, but I also experimented with serging a few.  Serging took much less time, but I think the sewed ones will hold up better over time.  Perhaps I should go back and do a topstich around the ones I serged - just for added strength.

We pre-washed and dried everything because we know that cloth diapers shrink significantly after their first few washes/dries.  They shrink and the shape distorts, making them difficult to work with, even after being ironed.  The edges and lines aren't all straight and even, but I did my best.  The Sew She Sews blog mentions that she never pre-washes and they turn out fine, so in the future I might try that.  At least then the burp cloths will look nice for at least a few days, or until they get washed.


Tuesday, October 4, 2011

Halloween skirt


I was recently given a boat load of assorted fabric from a very dear Aunt.  I have no idea what I'm going to do with most of it, but one fabric stood out and HAD to get worked on immediately.  The Halloween fabric!  It was given to me on September 28th - a short month before the actual holiday - so I started working on it on the 29th.  It was just enough fabric to make an adorable little skirt for Claire.  All I did was sew two pieces together (front and back), serge all the edges, roll up and sew the hem, create a casing for waistband elastic, and sew.  The next day I paired it with an equally festive shirt, black tights and black shoes for a day of fun at the playground and park.


this is the waistband.  I did a topstitch 1/8" from the top, then I did a thick stitch at the bottom of the elastic casing.

I did a double stitch around the hem
here you can see the inside of the hem (vertical on the left) and the inside of the side seam (horizontal center)


I admit it's hardly playground attire, but I just had to have her wear it, and I knew she'd be just fine.